Australische Formel 3 Meisterschaft 2009
Top 10 der Fahrerwertung
Klasse A
| 1 |  Joey Foster 7 Siege Joey Foster 7 Siege |
265 |
| 2 |  Tim Macrow 7 Siege Tim Macrow 7 Siege |
257 |
| 3 | Matt Sofi 1 Sieg |
192 |
| 4 |  Ben Crighton Ben Crighton |
151 |
| 5 | Mitchell Evans 1 Sieg |
32 |
| 6 | Ray Chamberlain |
30 |
| 7 | Mathew Radisich |
25 |
| 8 |  Rio Haryanto Rio Haryanto |
18 |
Klasse National A
| 1 | Tom Tweedie 12 Siege |
288 |
| 2 | Graeme Holmes |
124 |
| 3 | Jesse Wakeman |
116 |
| 4 | Chris Gilmour 1 Sieg |
93 |
| 5 | Maher Algadri |
86 |
| 6 | Roger I'Anson |
49 |
| 7 | Leanne Tander (Ferrier) 2 Siege |
44 |
| 8 | Bryce Moore 1 Sieg |
33 |
| 9 | Bevan Carrick |
31 |
| 10 | Kristian Lindbom |
30 |
Klasse National B
| 1 | Peter Kalpakiotis 2 Siege |
78 |
| 2 | Andrew Mill 2 Siege |
44 |
| 2 | Rod Anderson 2 Siege |
44 |
Rennkalender
Zum Zoomen mit dem Mausrad zuerst in die Karte klicken.
Klassen
Das Starterfeld in Bildern
-
 #5 Joey Foster – Team BRM – Dallara F305 - AMG Mercedes · © Formula 3 Australia
-
 #25 Tim Macrow – Scud Racing – Dallara F305 - AMG Mercedes · © Formula 3 Australia
-
 #2 Matt Sofi – Astuti Motorsport – Dallara F305 - Mugen Honda · © Formula 3 Australia
-
 #3 Mathew Radisich – Team BRM – Dallara F305 - AMG Mercedes · © Formula 3 Australia
-
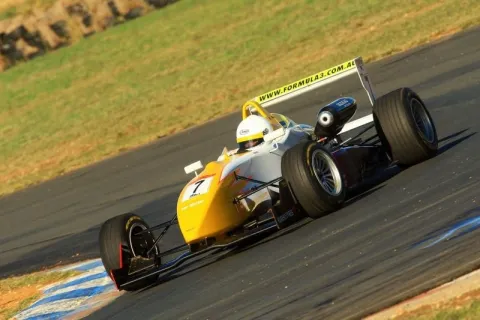 #7 Ray Chamberlain – Astuti Motorsport – Dallara F305 - Sodemo Renault · © Formula 3 Australia
-
 #4 Mitchell Evans – Team BRM – Dallara F305 - AMG Mercedes · © Formula 3 Australia